Order Form is a simple yet powerful feature of EventBookings that simplifies collecting more data from your attendees and puts you in more control.
You can collect additional information from attendees by creating an order form for the customers to fill out while purchasing tickets. The order form allows you to collect necessary information from attendees and gives insight into what to expect on the event day.
Create order from
To create or set up an order form:
- Go to your event dashboard.
- Select the order form under the “more options” category.
- Click “Enable it for this event” if your order form is not enabled.
- Click Create an order form.
- Choose templates that best suit the event goal and click continue.
- Set up your order form in the editor. More details about the editor are provided below.
- Click save when done.
You are done creating your order form, and you can make it live by clicking on the enable button.
About the order form editor
Form Fields
The form editor consists of the form page and form fields on the right panel, which you can drag and drop or click to add form elements to the page, which include Checkbox Group, Date, Number, TextArea, Text Input, File Upload, Select and Radio Group.
Form title
- Click on the pen icon beside My Form to edit the form title.
- Enter your form title and click Save. Your form title will be updated.
- Please note that you can enter up to 70 characters, including spaces for the form title.
Field Functions
Each form fields have the following functions:
- Delete Deletes the field from the form page.
- Clone: Creates a copy of the field below.
- Settings: Allows you to customise field attributes, options, and conditions.
- Drag: This allows you to drag fields and place them in your desired position in the form.
Field Settings
Attributes
- Required: Mark or unmark the checkbox to make the field mandatory or optional.
- Placeholder: Enter a placeholder text as short instructions for the users.
- Instructions: Type essential instructions for the attendees related to the field.
- Validation: You can set validations for the fields. Validation options vary with the selected field type. For example, you can define the maximum or the minimum number of choices for the checkbox group. In contrast, you can define the maximum and minimum number of characters for the text input.
- “How do you want to collect information?“: Define if you want to collect information for buyers only or all attendees (for every ticket purchased). You can also display the information provided on the order confirmation and ticket by enabling the “Show the attendee’s answer on their order confirmation and ticket”.
Options
Important Note: This field is only visible for Checkbox Group, Select, and Radio Group.
- Checkbox: Mark the checkbox or options to make it appear by default when a customer visits the form for the first time.
- Edit option label: Click on the options and edit your field labels.
- Remove: Click on the cross icon beside each option to remove them from the field.
- Add option: Click “+Option” to add new options to the field.
Conditional Questions
Conditional questions only appear depending on a previous answer. They are great tools when you don’t want to send lengthy questions but need more information about response types.
For example, you can ask attendees if they will travel to the event in their car. If they respond yes, you can ask them to select their preferred parking slot, and if they answer no, the preferred parking slot option will not be visible to them.
Set up a conditional question.
To set up a conditional question for your checkout or order page:
- Go to your event dashboard.
- Select the order form under the more options category.
- Click the ellipsis of the order form and select edit form from the ellipsis menu. You can also set up conditional questions while creating your first order form.
- Go to settings of any form fields.
- Click the conditions tab of the form field settings.
- Set up conditions and click save.
About conditions
While setting up a condition for any form field, you must first set the IF section and define the target response in the THEN section.
- In the IF row, include the source question, define the logic (equals, not equals, contains, and not contains) and finally, set the source’s conditional value based on which THEN the row will trigger.
- In the THEN row, add the target field/question, define the behaviour logic (value, is visible, is not visible), conditional logic, and value.
For example, if any of your attendees select YES when asked, “Would you like to attend multiple sibling talent shows?” they will see the option “What would you like to perform?”. But if the attendees select NO, the “What would you like to perform” question will not be visible.
Finding the additional collected information
You can review the additional information, such as dietary requirements and other data for attendees from the checkout process, including the booking details in the bookings section of the event dashboard.
To access attendee details and custom data collected through the attendee form:
- Go to your events dashboard.
- Select bookings.
- Under the bookings tab, click three-dot of an attendee.
- Select attendee details to view all attendee information or select booking details to view all booking information.
Exporting Attendee Details:
- Go to your event dashboard
- Click on the Bookings tab
- Click on the three dots in the top right corner of the screen
- Choose “Export” from the dropdown menu
- Click “Export” to download the file
Exporting Booking Details:
- Go to your event dashboard
- Click on the Bookings tab
- Select the Tickets sub-tab
- Click on the three dots in the top right corner of the screen
- Choose “Export” from the dropdown menu
- Click “Export” to download the file.
How to edit attendee details
Efficiently managing attendee information is crucial for a smooth event experience. Whether it’s correcting details, updating orders, or modifying session information, having a streamlined process can save time and prevent confusion. EventBookings provides an easy way to edit attendee details and update order information.
Navigate to the Bookings
Begin by accessing the Bookings section from your organiser dashboard. This is where all attendee and order details are listed for easy management.
View Attendee Details
Click on the booking to view the attendees associated with it. You will see a list of all attendees linked to the event.
Access Additional Information
To edit an attendee’s additional details:
- Click on the Three-Dot Menu next to their name.
- Select Additional Information from the dropdown.
This will display all the extra information provided by the attendees during registration. Make the necessary updates and proceed.
Save the Updates
After editing the details, click the Save Button to apply the changes. Once saved, the most recent update will be displayed at the top of the details section for transparency.
Update Order Details
If you need to update order-related information, follow these steps:
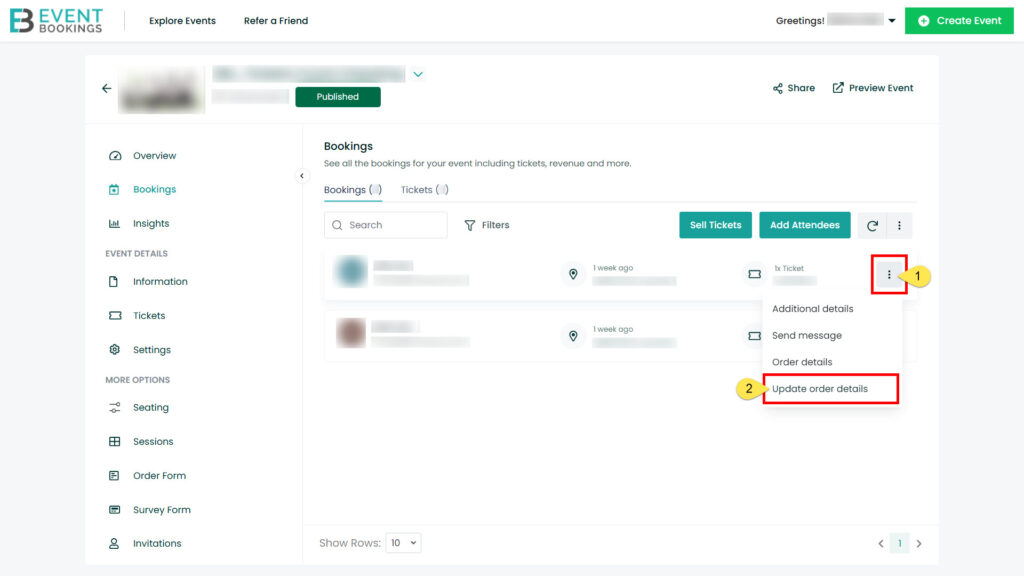
- Click the Three-Dot Menu next to the booking.
- Select Update Order Details from the dropdown.
This will open the order information page, showing details like the attendee’s email address.
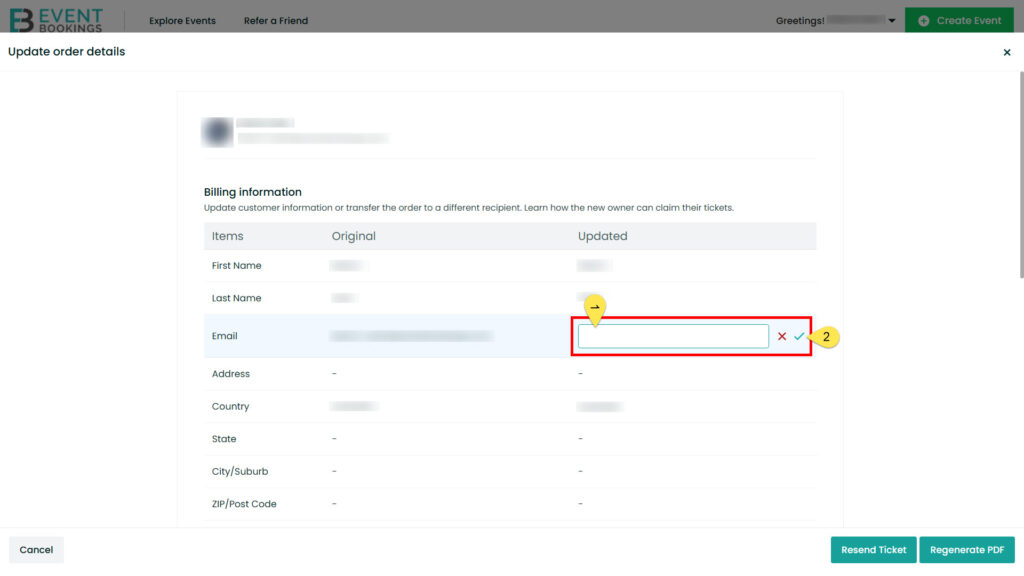
Edit Email or Session Details
To update an email address, click the Edit Option next to the email field. For recurring events, you can also modify the date and time of specific sessions. After making updates, you can:
- Regenerate the PDF with the updated information.
- Resend the PDF to the attendee for confirmation.
Regularly review and update attendee details to avoid communication errors and ensure a seamless event experience. For further assistance, visit the EventBookings Support Centre.
Resend Ticket & Regenerate PDF
Managing ticket updates and reissuing them is a crucial part of event planning. It ensures attendees have accurate and up-to-date information. EventBookings allows organisers to easily resend tickets and regenerate PDFs when updates are needed.
Follow these detailed steps to ensure accurate and timely updates for your attendees.
Step 1: Navigate to the Bookings Section
Start by logging into your EventBookings account and go to your event page. Find the Bookings section via the event dashboard. Here, you can see all attendee details and manage their orders.

Step 2: Access Order Details
Click on the Three-Dot Menu next to the attendee’s name. From the dropdown, select Update Order Details to open a detailed view of their ticket order, including event information, schedules, and attendee-specific data.
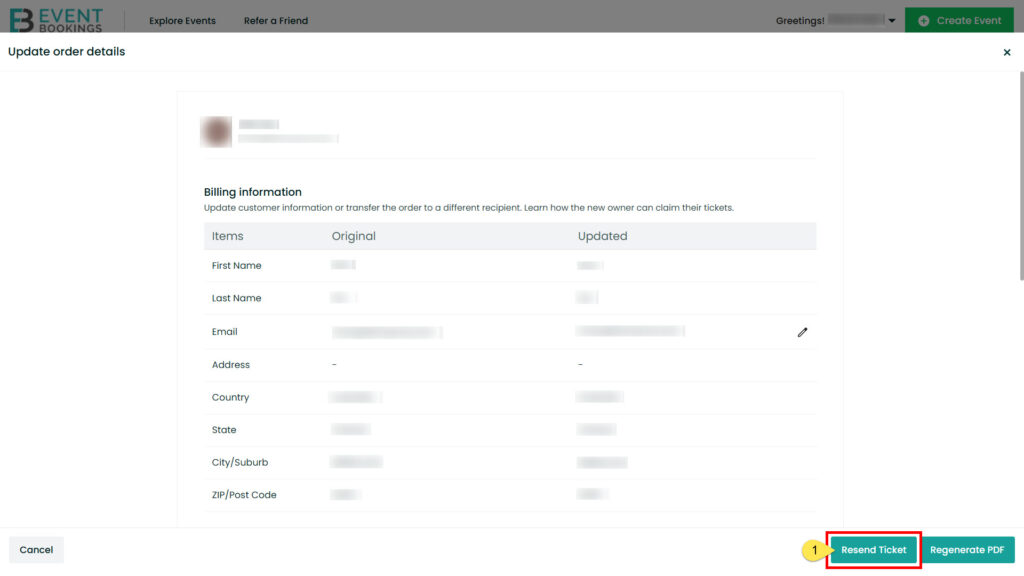
Step 3: Resend Tickets Without Updates
If the attendee has misplaced their ticket or didn’t receive it, you can resend the original ticket by clicking the Resend Ticket button. This will send the ticket as-is without any updates to the details.
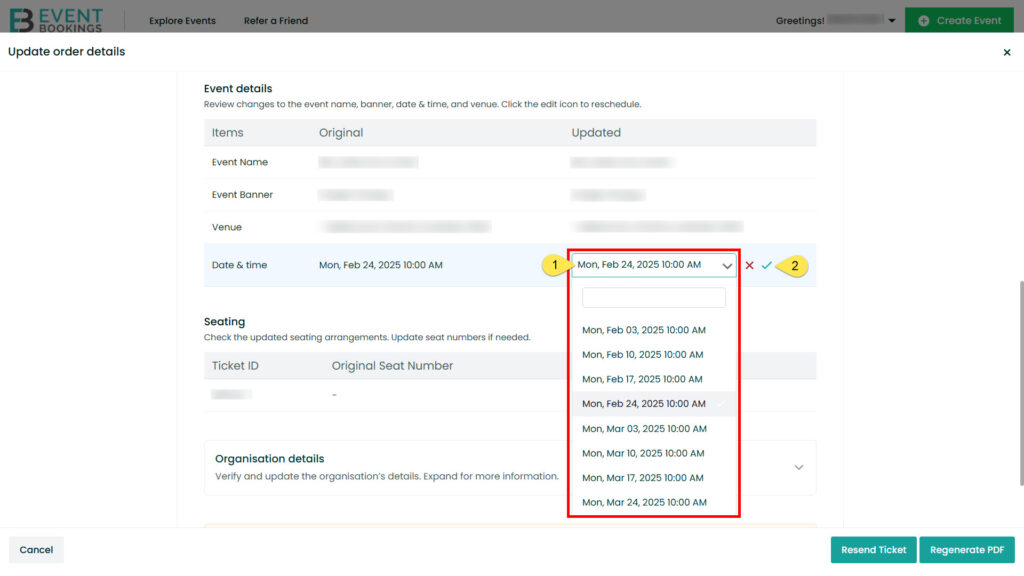
Step 4: Update the Necessary Information
You can update the attendee’s email address in the order details if necessary. After making changes, click the Right Icon to save them. This ensures the new information is applied.
For recurring events, you can also update the occurrence date and time to match any scheduling changes.
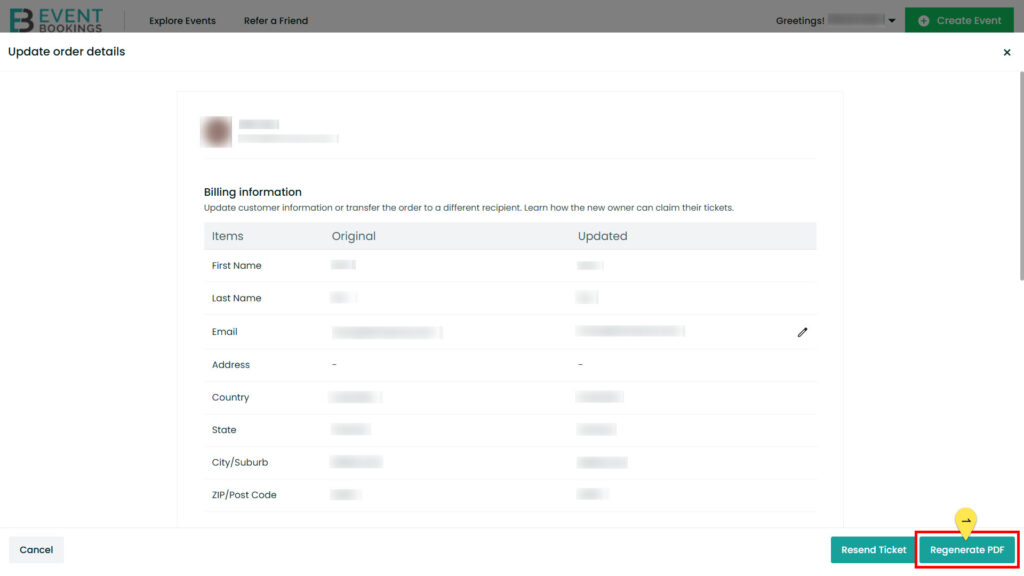
Step 5: Regenerate the PDF
Once updates are complete, click the Regenerate PDF button. This step ensures that the updated information is accurately reflected in the ticket PDF. At the right-end corner, you will find two options: Regenerate PDF and Resend Ticket.
You must note that if you click Resend Ticket before regenerating the PDF, tickets with previous information will be sent. So, make sure to click Regenerate PDF before resending the ticket when you are updating information.
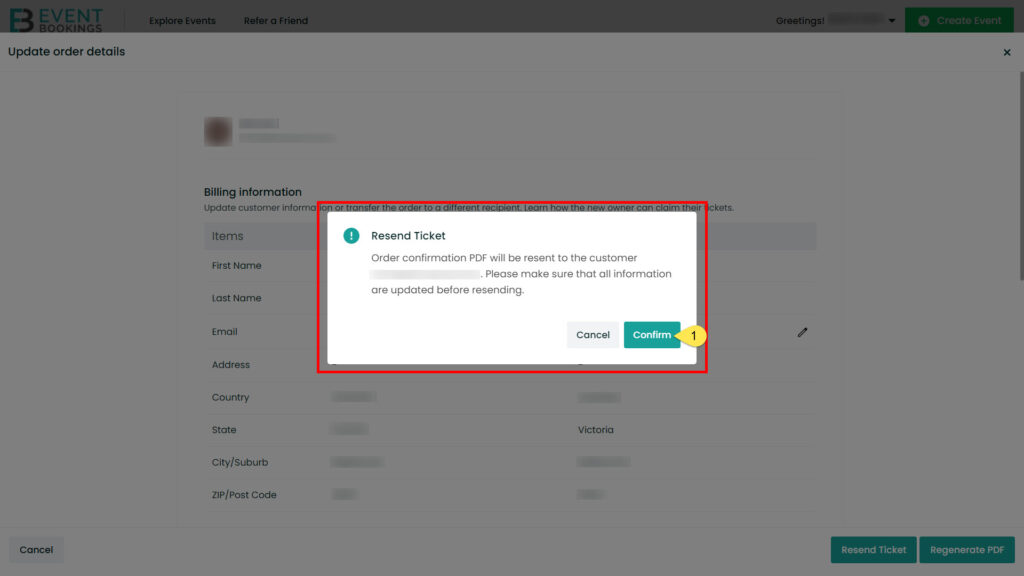
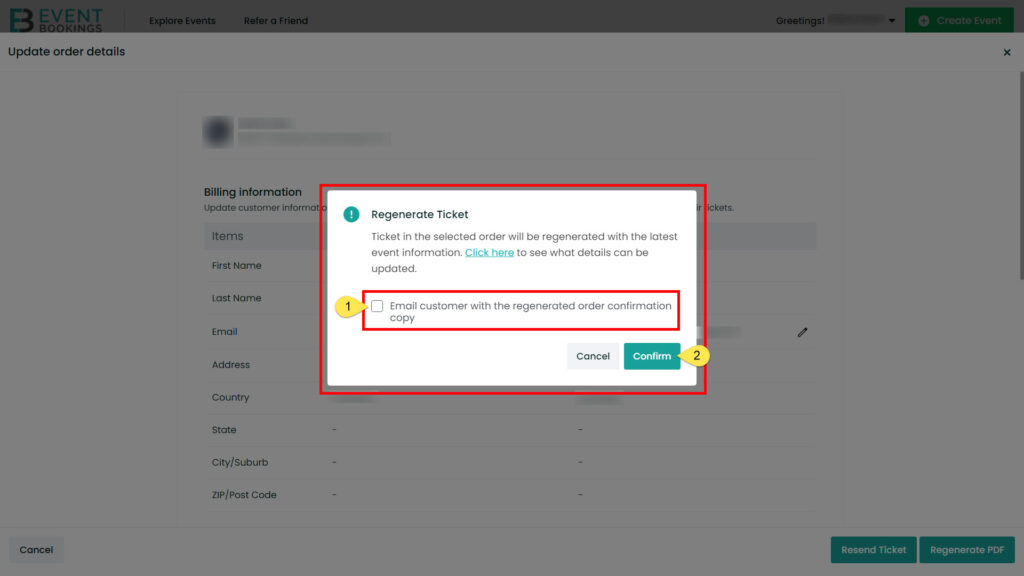
Confirm and Finalise
Once you click the Regenerate PDF button, you will find two buttons: confirm and cancel. Before clicking on confirm, check the box labelled Email customer with the regenerated order confirmation copy and mark it to automatically send the updated ticket to the attendee.
Once you are sure all details are correct, click the confirm button.
Need Assistance?
If you encounter any issues or have questions, visit the EventBookings Help Centre or contact our support team for expert assistance. Ensure your attendees have a seamless experience with accurate ticket details every time!