What is EventBookings?
EventBookings is a comprehensive online event ticketing platform designed to simplify the process of event management for organisers. With EventBookings, organisers can easily create and manage events, sell tickets, and collect payments online. Attendees can conveniently browse for events and purchase tickets directly from the EventBookings website.
Key features of EventBookings include:
- Event Creation and Management: Organisers can effortlessly set up event details such as the event name, date, time, location, and ticket types, streamlining the process of event planning and management.
- Ticketing: Event organisers have the flexibility to create and sell event tickets through EventBookings. They can also implement discounts, promotions, and refund/exchange policies to enhance the ticketing experience for attendees.
- Payment Processing: EventBookings offers a variety of payment processing options, including Stripe, a fully PCI DSS-compliant EventBookings Payment Processor, GPay, Apple Pay, AfterPay, PayPal and PayFast(South Africa Only), ensuring secure and seamless transactions for organisers and attendees.
- Reporting: Event organisers can generate detailed reports on various aspects of their events, including ticket sales, attendee demographics, and financial performance, providing valuable insights for future planning and decision-making.
EventBookings is known for its user-friendly interface and robust features, making it a popular choice for event organisers of all sizes. Its comprehensive suite of tools can help organisers save time and streamline their event management processes, ultimately leading to more successful and efficient events.
Supported Countries
EventBookings supports multiple countries and currencies. Here is the list of all supported countries and fees EventBookings charges:
| Country | Ticketing Fee | |
| 1 | Australia | 2.5% + A$0.30 per ticket sold (When EventBookings is used as payment processor) 1% + A$0.30 per ticket sold (Other payment processor) |
| 2 | Canada | 1% + C$0.30 per ticket sold |
| 3 | Ireland | 1% + €0.20 per ticket sold |
| 4 | New Zealand | 1% + NZ$0.30 per ticket sold |
| 5 | United Kingdom | 1% + £0.20 per ticket sold |
| 6 | United States | 1% + $0.30 per ticket sold |
| 7 | Argentina | 1% + A$50 per ticket sold |
| 8 | Austria | 1% + €0.20 per ticket sold |
| 9 | Bangladesh | 1% + ৳10 per ticket sold |
| 10 | Belgium | 1% + €0.20 per ticket sold |
| 11 | Brazil | 1% + R$1.00 per ticket sold |
| 12 | Bulgaria | 1% + лв0.18 per ticket sold |
| 13 | China | 1% + ¥1.50 per ticket sold |
| 14 | Croatia | 1% + €0.20 per ticket sold |
| 15 | Cyprus | 1% + €0.20 per ticket sold |
| 16 | Czech Republic | 1% + Kč5.00 per ticket sold |
| 17 | Denmark | 1% + kr1.30 per ticket sold |
| 18 | Egypt | 1% + E£3.00 per ticket sold |
| 19 | Estonia | 1% + €0.20 per ticket sold |
| 20 | Fiji | 1% + F$0.30 per ticket sold |
| 21 | Finland | 1% + €0.25 per ticket sold |
| 22 | France | 1% + €0.25 per ticket sold |
| 23 | Germany | 1% + €0.25 per ticket sold |
| 24 | Gibraltar | 1% + £0.30 per ticket sold |
| 25 | Greece | 1% + €0.15 per ticket sold |
| 26 | Hong Kong | 1% + H$1.00 per ticket sold |
| 27 | Hungary | 1% + Ft35 per ticket sold |
| 28 | India | 1% + ₹10 per ticket sold |
| 29 | Indonesia | 1% + Rp1500 per ticket sold |
| 30 | Italy | 1% + €0.25 per ticket sold |
| 31 | Japan | 1% + ¥20 per ticket sold |
| 32 | Jordan | 1% + د.ا0.10 per ticket sold |
| 33 | Latvia | 1% + €0.20 per ticket sold |
| 34 | Liechtenstein | 1% + Fr0.30 per ticket sold |
| 35 | Lithuania | 1% + €0.20 per ticket sold |
| 36 | Malaysia | 1% + RM0.50 per ticket sold |
| 37 | Malta | 1% + €0.20 per ticket sold |
| 38 | Mexico | 1% + M$1.30 per ticket sold |
| 39 | Netherlands | 1% + €0.25 per ticket sold |
| 40 | Norway | 1% + kr2.10 per ticket sold |
| 41 | Philippines | 1% + ₱4.50 per ticket sold |
| 42 | Poland | 1% + zł0.15 per ticket sold |
| 43 | Portugal | 1% + €0.20 per ticket sold |
| 44 | Qatar | 1% + ر.ق0.99 per ticket sold |
| 45 | Romania | 1% + lei0.30 per ticket sold |
| 46 | Saudi Arabia | 1% + ر.س0.80 per ticket sold |
| 47 | Singapore | 1% + S$0.25 per ticket sold |
| 48 | Slovakia | 1% + €0.20 per ticket sold |
| 49 | Slovenia | 1% + €0.20 per ticket sold |
| 50 | South Africa | 1% + R2.50 per ticket sold |
| 51 | South Korea | 1% + ₩300 per ticket sold |
| 52 | Spain | 1% + €0.25 per ticket sold |
| 53 | Sweden | 1% + kr2.10 per ticket sold |
| 54 | Switzerland | 1% + Fr0.25 per ticket sold |
| 55 | Taiwan | 1% + NT$5.00 per ticket sold |
| 56 | Thailand | 1% + ฿3.50 per ticket sold |
| 57 | United Arab Emirates | 1% + د.إ0.80 per ticket sold |
Your Dashboards
EventBookings is designed to offer a versatile and user-friendly experience, enhancing your navigation throughout the platform. To provide a seamless experience, we have divided our Dashboard into two segments:
- Organiser Dashboard: This section is tailored to meet the needs of event organisers, offering a comprehensive view of your events, ticket sales, attendee data, and other key metrics. Here, you can manage all aspects of your events, from creating new events to tracking their performance.
- Event Dashboard: The Event Dashboard provides a detailed overview of each event you manage. This segment allows you to focus on the specific details of each event, such as ticket sales, attendee engagement, and event-specific analytics.
By dividing the Dashboard into these two segments, we aim to streamline your navigation experience, making it easier for you to access the information you need and manage your events more efficiently.
Organiser Dashboard
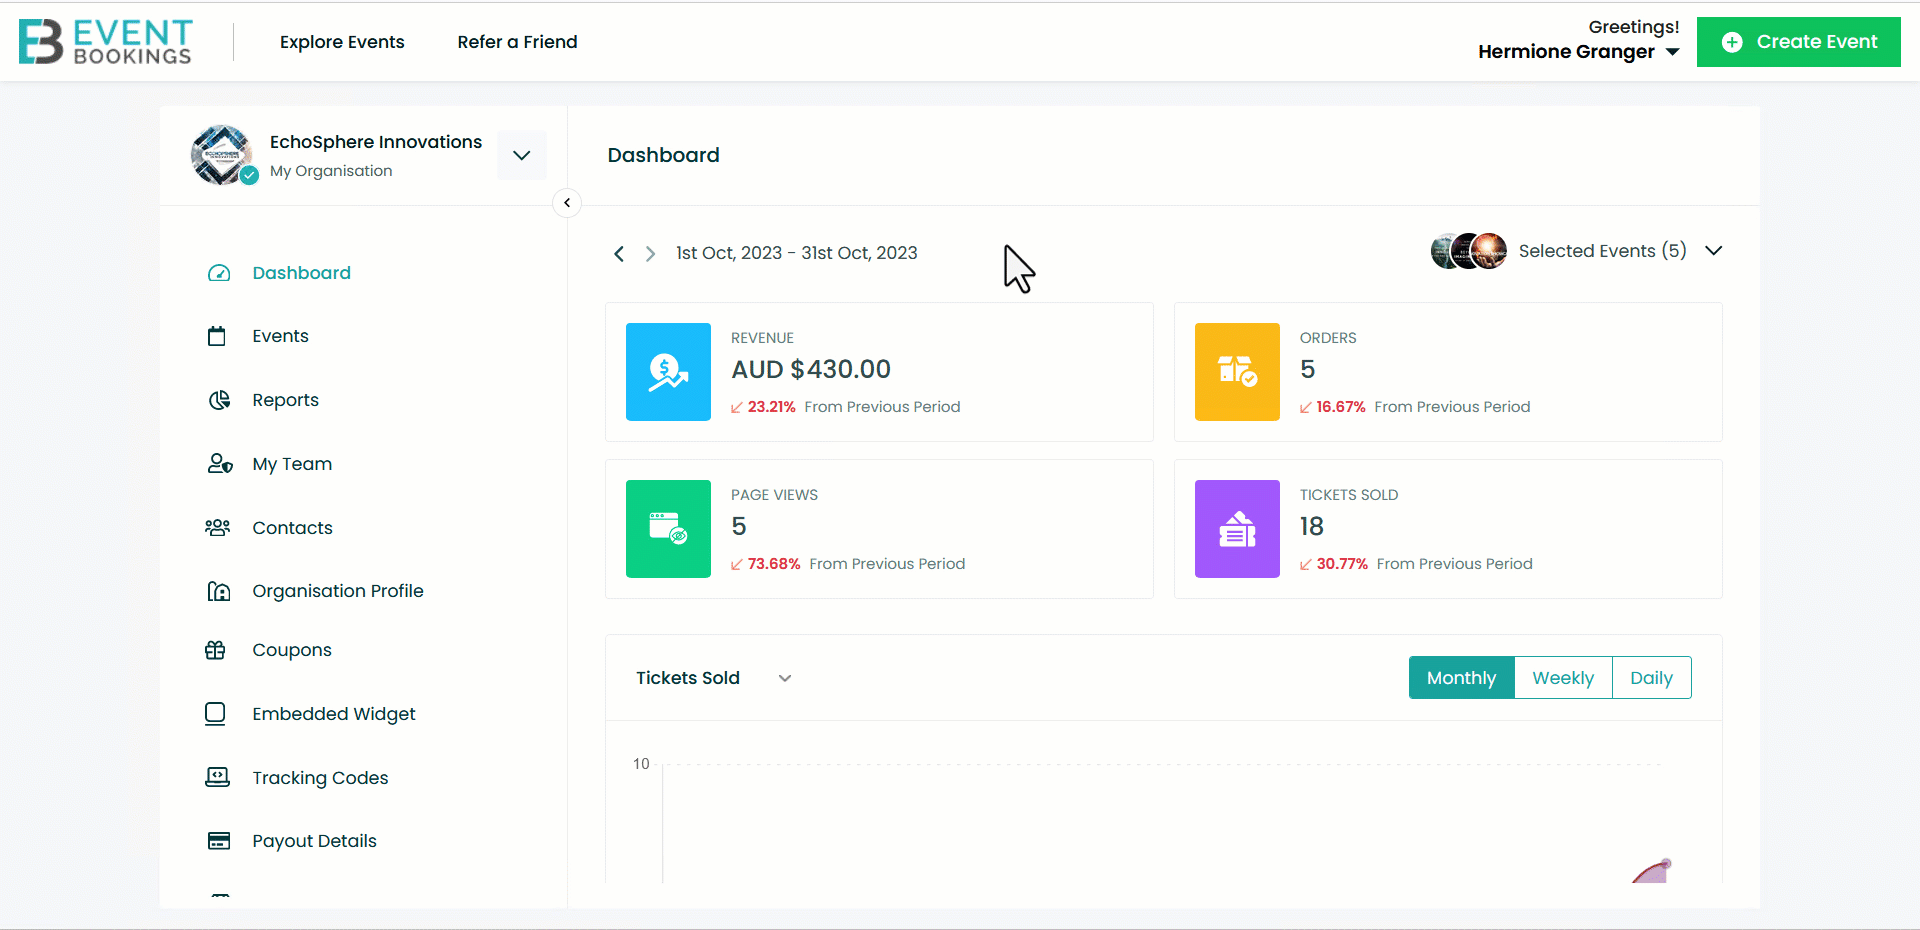
The Organiser Dashboard on EventBookings is a powerful tool for managing multiple events, bookings, and invitations efficiently. It serves as the control panel for your organisation, offering a comprehensive view of your hosted events and their performance within a selected time frame. This vibrant hub of information provides insights into metrics such as ticket sales, revenue, orders, and page views, allowing you to track the success of your events at a glance.
Where is my Organisation Dashboard?
Accessing the Organiser Dashboard is easy. If you’ve created an event on EventBookings, select your organisation from the profile dropdown to enter the Dashboard. Once inside, you’ll be greeted with an energetic display of your events’ performance. The Dashboard allows you to navigate different time frames, analyse past trends, and plan for future events effectively.

The Dashboard’s graph displays the number of tickets sold by default, but you can customise it to show revenue, orders, or page views by selecting the desired metric from the dropdown panel. Additionally, the navigation panel on the left side of the Dashboard provides access to powerful tools to help you maximise your dashboard experience.
| Navigations | Short Description |
|---|---|
| Events | Lists all created, drafted, and published events. Create, manage, cancel or delete events from here. |
| Reports | View orders, tickets and customer reports of all your events. |
| My Team | Manage your event team for collaborative management. Create roles and invite your team members to join. |
| Contact | Create and manage contact lists for email campaigns. Use system-generated contacts or bring your list to EventBookings |
| Organisation Profile | Bring your brand to EventBookings. Update profile and manage organisation settings. |
| Coupons | Set up promotional coupons for event discounts. Create and manage coupons for all of your events. |
| Payment Collection | Set up payment methods for receiving event revenue. Available payment methods: • SecurePay (Available only in Australia) • Stripe • Afterpay • Apple Pay • Google Pay • PayFast (Available only in South Africa) • Offline (Any Offline payment methods) |
| Subscription | Review your subscription. Upgrade to premium or renew add-ones. Subscription enables increased limits and features for your events. |
| Embedded Widget | Create widgets and generate codes that can be added to your website. |
| Merchandise | Create and manage add ones that can be sold along with event tickets. |
| Tracking Codes | Track and analyse event marketing performance. |
Event Dashboard
The event dashboard is the central hub for orchestrating event planning and execution, offering a meticulous vantage point to oversee and manage every facet of an event efficiently. It’s akin to the cockpit of a meticulously engineered aircraft, where all instruments and controls are within reach, assuring a seamless journey from inception to conclusion.
What can you do with the Event Dashboard?
- Event Status and Actions
- Event Performance Metrics
- Email Campaigns
- Coupon Management
- Visitor Insights
Where is the Event Dashboard?
- Go to your organisation dashboard.
- Select Events from the left panel.
- Navigate to the event you want to visit, click on the event title, or select the manage event option from the three-dot menu.
- You will get directed to the event’s Dashboard, where you will find the following information and actions.
All the following features apply to both virtual and venue events.
Overview of all the functionalities of the Event Dashboard:
| Navigations | Description |
|---|---|
| Bookings | Get a detailed overview of all the bookings for your event. You can manage your bookings by bookings list, tickets and waiting list. You can also cancel and refund orders of your attendees. |
| Insights | View the demographics of the event and your attendees. |
| Information | Set all your event information, including name, type, date-time, and visibility. You can also add texts, images and videos to display on your event page and add tags to your event to improve event visibility. |
| Tickets | Create or edit your event tickets here. Choose different ticket types, including single, group and donation. Set the prices and other settings (variations and restrictions) you want to apply. |
| Settings | Change your booking options, early-bird discounts, coupons, event restrictions and various settings for your event. |
| Seating | Manage and customise event seating arrangements. |
| Sessions | Create sessions for your event if your event occurs within multiple sessions. Enable the “My event has multiple sessions” option and add the session’s name, image, date, time duration and description. |
| Order form | Set up an order form using the form editor tool to collect additional data from attendees. Select templates or create from scratch and drag-and-drop form elements on the editor. |
| Survey form | Use the survey form feature on the event’s dashboard page to take feedback from your attendees. Enable the “I want to create a survey for this event” option. Add questions, select the page where the survey pop-up will appear and update. |
| Invitations | Send booking invitations or RSVP to your attendees via email |
| Campaigns | Send event reminders and any other information related to your events to your contacts and attendees. |
EventBookings Apps
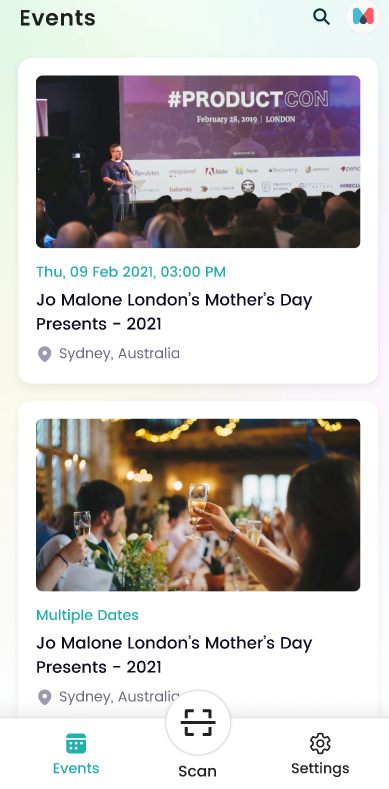
EventBookings mobile app provides an all-in-one solution for event ticketing. This app allows you to easily create events, sell tickets, and explore upcoming events in your area. You can easily find enjoyable activities based on your preferred date, time, and location. Once you purchase your tickets, you can store them securely on your mobile device for hassle-free check-in.
EventBookings also enables you to handle event sales and attendees in one place. You can create and modify events, keep track of ticket sales in real-time, confirm attendance, and monitor attendance live.
With the EventBookings app, you can:
- Directly create events
- Edit event details such as description, ticket types, and quantity while on the go.
- Monitor ticket sales with real-time data access.
- Make changes to the event listing from any location
- Streamline guest check-in with simple ticket scanning
- Track live attendance for a better understanding of the event’s progress
- Discover popular and new online and venue events
- Receive personalised event suggestions based on interests
- Share events with friends
- Add events to your calendar for future reference
- Purchase and manage tickets
- Use the app to check in, eliminating the need for paper tickets.
You can get this app from the App Store for iOS and the Google Play Store for Android.
EventBookings Scan Station
EventBookings Scan Station got your back on the event day to authenticate attendees. You can scan event tickets on the go and verify whether the attendee is valid. It helps not just to establish attendees; it will keep track of who of your registered attendees have attended the event and enable you to make more data-driven decisions.
Once you download and install it from the App Store or the Google Play Store and log in to the app using your EventBookings credentials, you’ll land on a home page like this:
The events from the selected organisation will be presented in ascending order based on their scheduled date and time. The list will exclusively include events categorised as having a designated venue or events still pending confirmation.
Beside the search bar, there’s another icon for the Organisation profile. This lets you see organisation details and switch to a different organisation.
Clicking on the Scan button, you can start scanning the attendees’ tickets, and upon each successful scan that authenticates the attendee’s identity, a “Check-In Completed” will appear, displaying all the event details.

If a ticket is scanned for the second time, a modal will appear with an “Already Checked-In” message.
You can add custom questions from the “Advanced Activity Tracking” features, which will appear after scanning a ticket. This enables you to easily track and record event activities like food collection or attending sessions.
EventBookings Scan HQ
You have the Scan Station app installed on multiple devices. You need to manage them all from a single device. Here comes the EventBookings Scan HQ app.
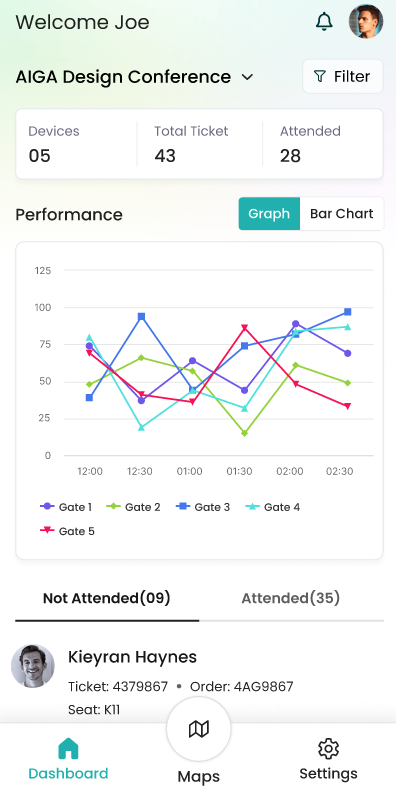
Once you download and install it from the App Store or the Google Play Store and log in to the app using your EventBookings credentials, you’ll land on a home page like this:
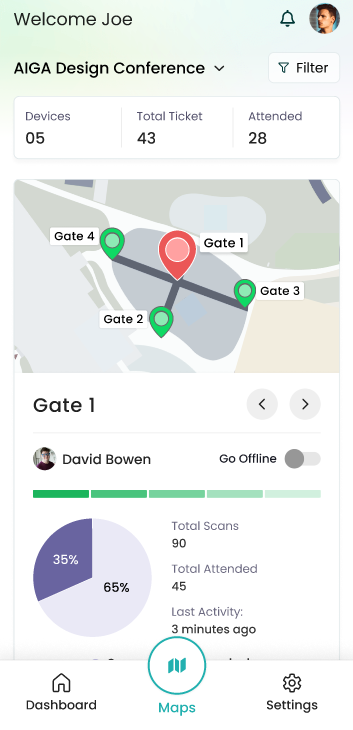
“Devices” indicates the number of devices utilised for ticket scanning, while “Total Tickets” signifies the overall count of tickets that have been sold. “Attended” corresponds to the total number of tickets that have been scanned and marked as attended
Monitor the activity of checking devices on the day of your event
- Open the app
- Navigate to the “Dashboard” section.
- Within this section, you’ll find graphical representations like Graphs and Bar charts, allowing you to gauge the performance of different devices.
- Additionally, users can review attendee and non-attendee information.
To Review the Tickets Checked by each device:
- Open the app
- Remain on the Maps page
- Look for the < > signs beneath the Google Map
- You can easily switch between different pages, displaying distinct details and a pie chart using these signs
Or,
- Open the app
- Remain on the Maps page
- Click on View Details
- The < > signs will direct you to separate pages for different devices to view their details.
If you can’t connect to the internet, don’t worry; you can scan tickets offline.
- On the Maps page, locate the “Go Offline” toggle
- Activate the toggle
- A notification will appear: “Are you sure you want to take the device offline?”
- Click “Yes”.
- Your scanning device is now offline.
Scanning tickets offline enables swift scanning with minimal latency. However, please note that real-time data won’t be updated while offline. Once you go online again, all data will be synchronised with real-time information.
To simultaneously switch all scanning devices to offline mode:
Open the app
- Tap on the “Settings” located at the bottom of the app
- Activate the toggle next to the option “Force All Devices Offline.“
- You will be alerted to confirm. Click Yes
By doing this, all devices connected for ticket scanning will transition to offline mode simultaneously.
How do you connect different devices?
| Option 1 Download the app & use the same credentials to log in to all devices | Option 2 Download the app; Supervisors can create a group within “My Team.”Supervisors can send invitations to team members who are willing to scan tickets. Team members will receive these invitations, and upon accepting, they will gain access to the app. |