The seating feature allows you to create event seating plans, create layouts (e.g., theatre, stadium or custom), set seat numbers, and arrange them as needed, simplifying event organisation. The seating system provides tools to design seating arrangements. You can assign one or multiple tickets to the created seats, allowing your attendees to choose their seats. You can create seating for all kinds of events as you need.
| Types of Events | Sample Events |
| Gala Events | https://www.eventbookings.com/b/event/gala-event-demo-seating |
| Cinema Hall | https://www.eventbookings.com/b/event/cinema-hall-demo-seating |
| Custom Layouts | https://www.eventbookings.com/b/event/custom-layout-demo-seating |
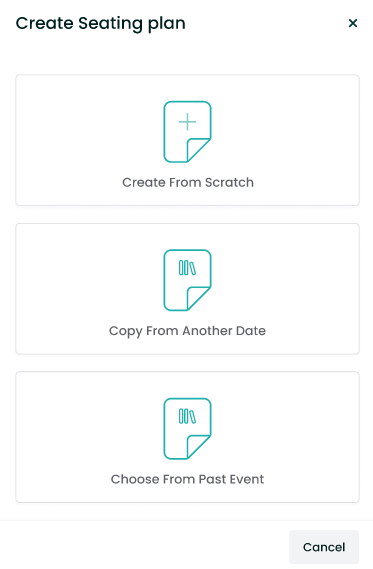
Create Seat Plans
Creating a seat layout for any event is easy with EventBookings’ seat builder tool. In three simple steps, you can create a customised design tailored to your event’s needs. Whether it’s a concert, conference, or gala, our intuitive interface makes the process seamless, allowing you to design the perfect seating arrangement easily.
Seating Map
Select elements from the right panel to create your seating plan and add them to your layout. Choose from rounded tables, rectangle tables, seating areas, and more to suit your venue. Enhance your plan by customising it with additional elements like circles, squares, lines, text, and icons, allowing you to create a detailed and personalised seating arrangement that meets your requirements.


Each element comes with its customisation settings. For tables or seating areas, you can select the number of seats and configure how they are labelled. This customisation extends to the ticketing process, where you can specify the name of each seat on the tickets.
To configure an element, select it; its settings will appear on the right-hand side. If you want to deselect any selected objects, click on an open space to clear your selection. This level of customisation ensures that your seating plan is tailored precisely to your event’s needs.
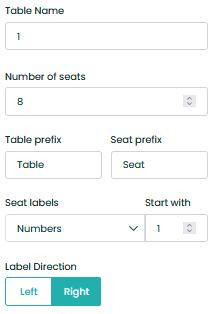
In the seating plan, ticket seat names are automatically generated using the following format:
Table Prefix + Table Name + Seat Prefix + Selected Seat Number.
For example, if an attendee selects seat number 7 at a table labelled “Table 1,” their seat number on the ticket will be “Table 1 Seat 7.” This naming convention ensures that attendees can quickly identify their assigned seats based on the table and seat numbers specified in the seating plan.


For seating arrangements, seat numbers are determined based on the label of the row and the selected seat number. You can customise the seating layout by setting the total number of seats and seats per row. Additionally, you can edit each row by assigning specific seats or repositioning them to align with your venue’s layout. This level of control allows you to create a seating plan tailored to your event’s unique requirements.
Assign Tickets
You can assign each seat to the tickets you want to sell. If needed, you can associate one ticket type with a seat or multiple ticket types. During ticket purchasing, attendees can select their preferred ticket type after choosing their seat. This flexibility allows you to effectively manage ticket sales and offer attendees a seamless experience when selecting seats and tickets for your event.

To assign a seat with a ticket, follow these steps:
1. Select the seat you want to assign a ticket to.
2. Choose the ticket type to associate with the selected seat.
3. The seat will be updated with the colour associated with the chosen ticket type. You can customise this colour to your preference.
Click on the space inside of an object to select the whole table or seat
If you want to assign more than one ticket to a seat:
1. Select the seat(s) again.
2. Choose the additional ticket type(s) you want to assign to the selected seat(s).
3. The seat(s) will be updated with the colour designated for seats with multiple tickets. You can also customise this colour as needed.

Attendees will have the option to choose their ticket at the time of selecting their seats.
This flexibility allows you to easily manage seat-ticket assignments and customise the visual representation of your seating plan based on your event’s requirements.
If you need to remove a ticket association from a seat, follow these steps:
1. Select the seat you want to remove the ticket association from.
2. Choose “Not Assigned” from the dropdown menu for ticket assignment.
Attendees
Maximise the efficiency of your event management with the seat reservation and seat hold features. These tools allow you to manage seating arrangements and guest preferences effectively.
To reserve seats for specific guests:
1. Select the seat you want to reserve.
2. Choose the attendee’s email from the list of guests for the event.
3. Once a seat is reserved, only the invited attendee can purchase that seat. Others will see it as unavailable.
It’s important to note that if the invited attendee purchases a seat different from the reserved seat, the system automatically makes the same quantity of reserved seats available.
To hold seats:
1. Select the seats you want to hold.
2. Add them to the hold list.
3. The held seats will be marked in red, indicating they are unavailable for booking.
4. Attendees can make bookings for these held seats once you remove them from the hold list.
Manage Seating for Multiple Dates
You can edit and manage seats for individual dates, giving you complete control over your event’s seating arrangements.
When creating a seating plan for an event with repeating dates or sellable sessions, you will receive a list of the occurrences or sessions. This allows you to create and manage seat plans for each occurrence or session specifically, ensuring that your seating arrangements are tailored to each date or session of your event.

Using the “configure” button, you can create a seat plan for a specific date and then easily copy it to the next day with just a few clicks.
This functionality allows you to configure the seating layout, ticket assignments, and seat reservations or holds for each day of your event. As you make these configurations, you will see the seat sales updated for each specific date, providing real-time information on seat availability and sales for each day.